
Aw, road trips. Remember how fun they used to be....y'know, before you had kids?! You'd pile all your friends into someone's SUV, bring a few of your favorite CDs and magazines. Simple. You wouldn't even pack any snacks for yourself because it was way more fun to stop at gas stations along the way to get your beef jerky and slushies. Oh, and bathroom breaks? Hardly ever had to stop. Those were the days.
But, if you have kids, you know that it is not all that simple. I have 2 precious children ages two and four, but spending 15+ hours in the car with them has proved they can be hoodlums. That is, of course, if you don't take the time to plan ahead.
Our family has taken 5 road trips in the past 2 years, 3 of those being all the way to Steamboat Springs, CO where my dad and step-mom live. We go every summer and occasionally during Spring Break. We are about to embark on our next adventure to Colorado in just a couple of days. Because my husband flat out refuses to get on a plane with our adorable kiddos, we choose to drive. I thought I would share some Road Trip Tips and Tricks to help you survive your next road trip....with kids!
To avoid too many of these....

MELTDOWN!
PLAN AHEAD
I am a planner, always have been and always will be. I like to be prepared for just about anything so it is important to think this way when planning for a road trip. Take the time to pack and plan what you will have available for your kids before they even think about saying "I'm bored" or "Are we there yet?!"
Now, my kids are still young so most of what I have pulled together and share is suitable for little ones.
Make lists! List for snacks to bring, activities for the car, what to pack in cooler the day of etc. Lists just give me a peace of mind when planning and it is so refreshing to see a list that is all checked off.
Make lists! List for snacks to bring, activities for the car, what to pack in cooler the day of etc. Lists just give me a peace of mind when planning and it is so refreshing to see a list that is all checked off.
Make a Trip-Tracker!
One thing that my kids really love is the trip-tracker that shows how much farther we have to go. It definitely does cut down on asking how much longer and they love to remind me to "move the car!"
One thing that my kids really love is the trip-tracker that shows how much farther we have to go. It definitely does cut down on asking how much longer and they love to remind me to "move the car!"

To make, you can print out or draw a picture of your car on card stock paper. (copy paper is way too flimsy) Then cut a 1 inch X 2 inch rectangle of card stock. Make a loop with the rectangle and tape together. Then glue this to the back of the car so you can put a ribbon thru it. Decide on your ribbon ahead of time so you know how big you want your loop to be. Then simply tie your ribbon to the hand rails, hooks, or whatever you have on the ceiling of your car. Done! You can now slide your vehicle along the ribbon to indicate how much further you have to go!

Almost there!
Gather toys and plan activities
What I like to do is gather some of their car-friendly toys about a week before we leave so I can stash them to the side so it will be more fun to play with in the car. I'm not big on going out to buy very many new things for the trip but occasionally you just have to. It's amazing how new little toys can make a crying toddler stop crying on a dime.
So...one of the things I do is head to the Dollar Store and take no less than $20 in, trust me, you can get some great stuff for less than that. I get a few toys and things for "surprise packages". I wrap them up with old wrapping paper, label the kids' initial on them and stash them in a bag to keep in the front seat with me. Every hour or so, (and sometimes not that often, I really just used as needed!) the kids open one of their "surprise packages" and you can have a little relief as they play with their new toys. I'm really not a fan of bribery but I did find myself saying, "Ok, let's see who can earn their next surprise package!" as my son is throwing his shoes and my daughter is complaining about dropping her book out of reach for the third time. The things we say we will never say. Ha! Makes me laugh. But, it works and I do not feel like I'm ruining my kids for life by using a little bribery a few times out of the year. Keeps us all sane and happy.

Surprise Packages!


SO surprised and happy!
I usually try to pack at least 8 or so for each kid and I have never used them all. Don't forget to pack enough for the way back too! Some of the things I've wrapped up are things like sticker books, squishy balls, mini drawing pads, glow in the dark stuff, mini travel games, books etc. Here was my bag from last March of the left-overs that I will be taking with me when we leave in a couple of days...

These were all the things left over from our last trip! I wrapped Noah's in the red dotted paper and Myla's in the chevron paper which was easier to pull out quickly.
 (Photo from Less-Than-Perfect Life of Bliss)
Click on the link for more HERE from the "Less-Than-Perfect Life of Bliss" blog.
Kids Clips-
Another great reinforcer for excellent road trip manners that I would like to try are these cute Kids Clips. Make cute clips out of clothespins, one for each child, and clip onto your visor in the front. The kids' clip will stay up as long as they are using good manners/behavior. If they don't, their clip comes down. If it is still up at the next stop, the child may earn a special treat. Maybe better for kids 3 and up. My 2 year old wouldn't really grasp this idea yet, I don't think.
Click on the link for more HERE from the "Less-Than-Perfect Life of Bliss" blog.
ACTIVITIES
While at the Dollar Store, I also pick up a few craft items and things I can use for activities in the car. Here are a few things we have done. Now I do have to preface that I am a 2nd grade teacher and have a lot of craft supplies from my classroom which is nice I don't have to spend that much $, but again, you can still get a lot for nothing at these dollar stores.
-Multi-colored Pipe cleaners to create different shapes and things. This seriously entertained my three year old last year for over 25 minutes...she made bracelets and necklaces, different twisty things.

Here was one of her masterpieces we just could NOT part with. Beautiful, isn't it? ;)
- Lace-up Cards- foam paper or card stock cut into shapes, holes punched around the edges. Then tie on a long piece of yarn, tape the end and you have a lace-up card! Excellent for fine motor skills! (Yes, that is the teacher in me talking)

Here are examples of the ones we have made and will re-use again!

- Symmetry Folders-
Not really sure what else to call this but here it is....

This one is half-way completed but what I did was gather some matching foam stickers to create a symmetry board. I glued a foam sheet in the inside of a file folder and drew lines for sections. I placed half the stickers on the left side of the sheet and attached a ziplock baggie with the other half of stickers for my daughter to use to make the same picture on the right side. I made three of these and only used 2 (and a half, I guess). It was interesting to watch her concentrate on placing the stickers in the right place. Something that seems so easy to adults can be a little more challenging to little ones.
-Guess a Color or Pick a # bag
I made this for one of our trips and also took it on the plane when we flew to California. Just get a paper bag (a shopping kind is best since it is a little more sturdy), cut the handles off and staple in the sides a bit so there is space for little arm to fit in. Get the foam cubes you can find at a dollar store or maybe even Wal-Mart to put inside.

To make this a multi-purpose activity, I used both sides of the bag.
On one side I wrote..

I would have my daughter pull out a certain number of cubes by just feeling with her hand. No peeking! She did this when she was 2 1/2 and it worked great. She was so surprised when she pulled out the correct number of cubes.
Then on the other side of the bag, I wrote...
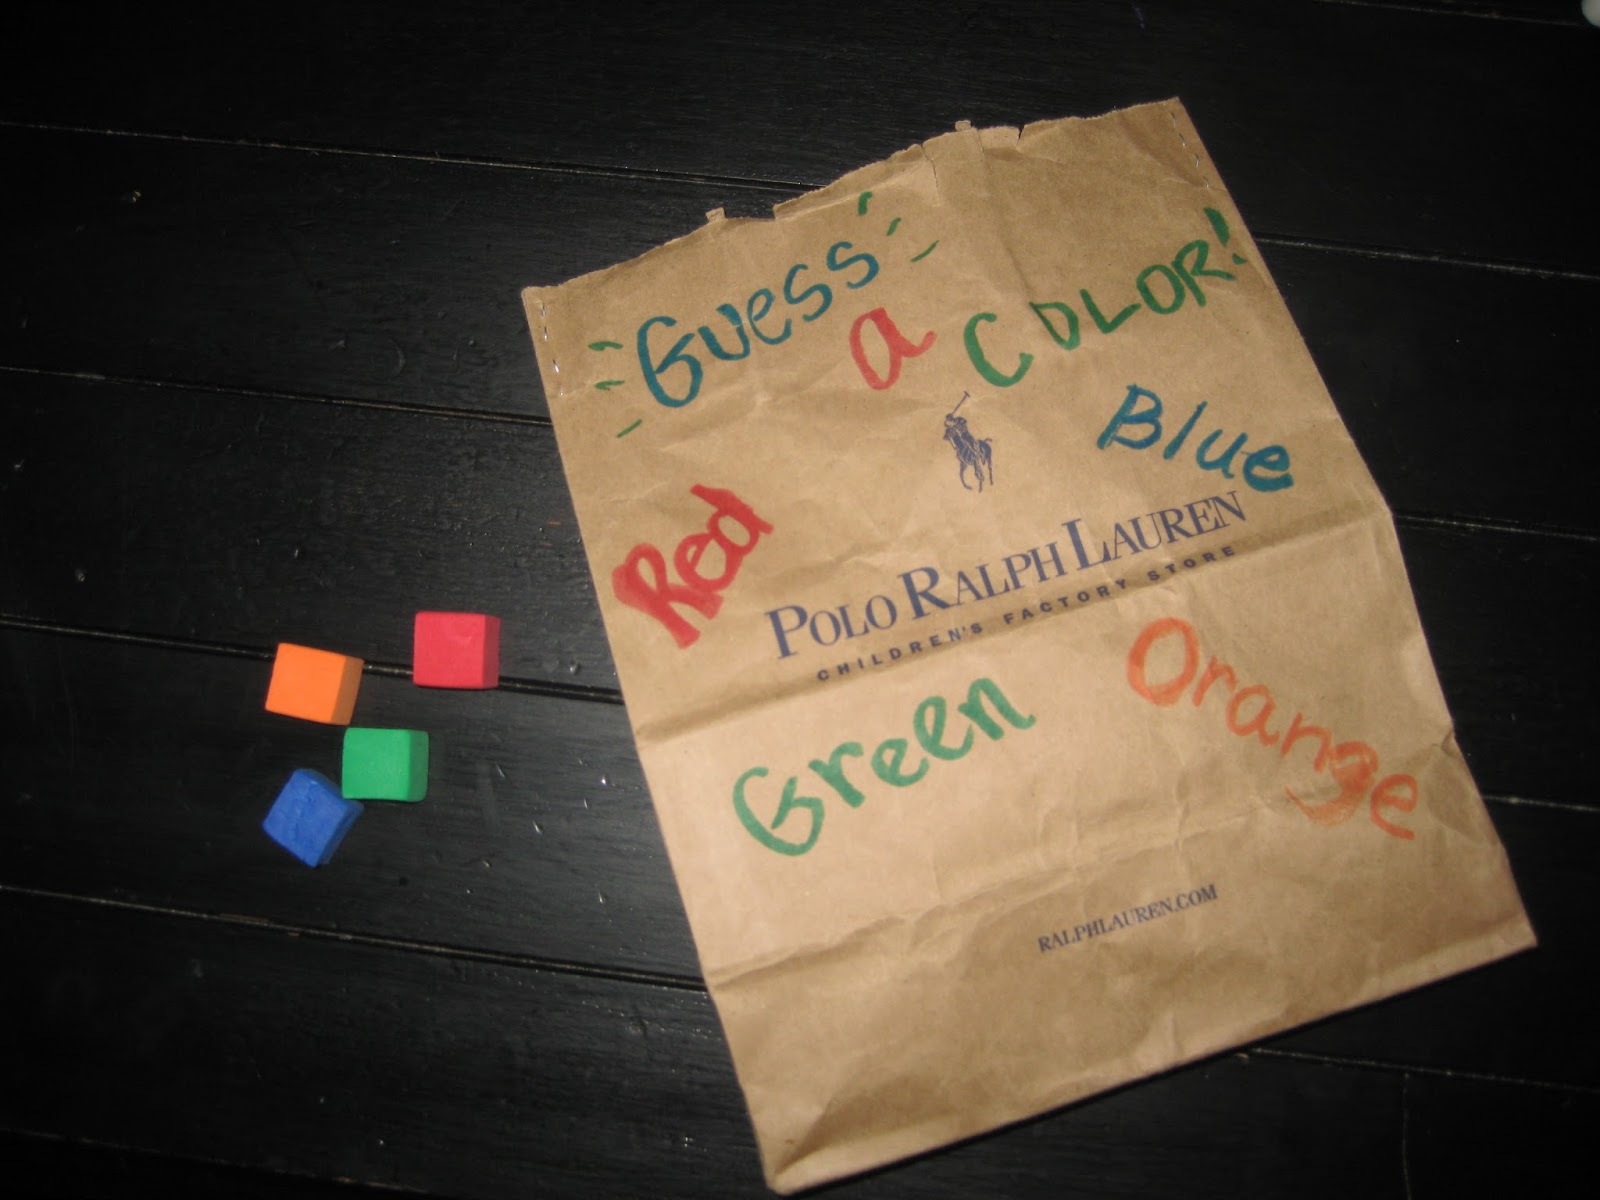
This was a guessing game to see which color she would pull out and again, lots of surprise and smiles when she was right. We took turns too and that made it more fun and interactive. Now that my kids are a little older, I can have them take turns instead!
- I-Spy binoculars and printable-
This was probably a spotlight activity for my daughter. She loved these! I made binoculars out of a recycled paper towel roll. I cut the tube in half and duct taped them together to make binoculars. Here is the link off of Pinterest that I used to make them.


"I Spy With My Little Eye"
I also printed these I Spy sheets out and slipped them in a sheet protector. I included a dry erase marker so she could mark off what she found. You can find the printables here and here.


Oh, I glued on a pom-pom to the end of the marker to serve as an eraser. I also had baby wipes too so she could wipe off and play again.

I just attached some velcro to a mini whiteboard and the marker and eraser. This really helped losing markers when storing.

 I would ask him to slide the "red one" or the "yellow one". I was impressed that he knew most of his colors!


We also bring the following....
- white board with dry erase maker and eraser attached!

I just attached some velcro to a mini whiteboard and the marker and eraser. This really helped losing markers when storing.

-magnets and a cookie sheet
A cheap cookie sheet makes for a great magnet board! I had some magnetic letters, numbers and shapes that we brought but you could get all of this at a dollar store. My son loved playing with the shapes.


OTHER STUFF...
-foam stickers and copy paper ( I like to stick these in a file folder that I've taped on the sides so it makes a pocket...make sense? It just creates a place for all the little pieces. I also include a couple of extra baggies for the kids to put their trash (backings of the foam stickers) But honestly...they end up all on the floor and in their hair...maybe when they're older??
-Books! I make sure to bring smaller ones that are easy to hold and store. Or the ones with the flaps or sliders that keep little hands busy and entertained.


-coloring books and crayons ( I like the idea of storing the crayons in an empty parmesan cheese container but haven't done that yet but plan to! I found the idea on Pinterest. Check it out here.)


-clipboards to place in their laps for easy coloring
-Reusable cling-on stickers and books are great too, they can put them on the windows and tell a story!
-glow sticks for night time fun!

Hard to tell but that's a glow stick making her smile!
-hand-held electronic toys are great too...

My son loves his little LeapFrog laptop and I love that there is a volume control on that thing!
- disposable cameras! My daughter (who was 3 at the time) absolutely loved snapping pictures and winding it to get it ready for the next pic...and it's always funny to see what images they capture! Most were of the back of my seat and her legs!
-iPad!! It's a must if you have one. Make sure to load it up with some great (FREE) kid-friendly apps that your kids haven't seen before. :)

In her own little world
And last and certainly not least...MOVIES!!
If you are fortunate enough to have a DVD player in your car, movies are great!! Now, I am not huge on the kids watching movies 24/7 while we are not in the car (don't want their brains turning into mush, right?!) BUT if we are in the car and it keeps them happy and quiet for more than 15 minutes...awesome! I have also found that this is the easiest way to get your kids to drift off into a peaceful slumber and we all want that!
Seriously...here is my son watching Happy Feet and look how happy he is!

And then just a few minutes later... he's OUT!

Aw, greatness...when they finally doze off and you have a little time to relax, finish reading your magazine article, listen to your music (softly, of course...you don't dare make too much noise in fear of waking your sweet babies.) And don't you even think about having to stop at a gas station to pee in a moment like this! Silence is golden...KEEP ON GOING!!
So, believe it or not, most of the things I've mentioned can fit in a canvas cube like this one. See?

I like this cube because it is sturdy and it can fit on the floor board where I can easily hand the kids stuff.
SNACKS!!
Bring lots of good snacks!! I always pack a separate bag or basket for snacks and make sure to put it in a spot for easy access. If your kids are younger like mine, you may want to keep in the front with you or where they can't get into it and make a mess. However if your kids are older and can open little packages on their own it would be best to have it within their reach. :)
And, it's really true what they say about healthy snacks...bring those healthier options and limit or leave the chips and sugary foods for another time. I speak from experience with my 2nd graders in my classroom...healthy snacks = better focus and concentration and less crankiness! Raise your hand if you want your kids to be less cranky in the car!!
I like to bring lightly salted pretzels sticks, low fat graham crackers, whole-grain goldfish, Organic fruit and veggie mashups (kids can squeeze them, great for the car) and those yummy Belvita breakfast bars. I prepare them ahead of time in individual servings in ziplock baggies for easy hand out. Plus I can be sure they don't eat too much because if that's the case, they won't eat lunch or dinner at the much needed rest stop!
Here is a pic of our snack bag...

Here is a pic of our snack bag...

We also bring a small cooler for more snacks like grapes, string cheese, blueberries and of course some drinks for everyone. I really only let the kids drink water in the car so I make sure to have some water bottles in there so I can pour into their sippy cups.
Our last trip I didn't split the grapes and blueberries into separate servings before putting in the cooler so I used their empty Teddy Grahams container to help split food. It worked really well! Plus it fits in their cup holders and perfect for little hands.

(As a side note..I realize these are not the healthiest snack in the world...that's why my husband and I ate half of them before giving to the kids! ha ha!)
I put the cooler behind the passenger seat so I can get to it pretty easily and my long-armed hubby can access it too.

I also hang a canvas tote on the back of the head rest so the kids can use for trash. Much better than bringing a huge trash bag or a grocery sack which ends up coming open and then the trash spills everywhere. I like the canvas bag because you can just throw in the washer when you get home if it gets dirty. Ooh! I also saw this genius idea of reusing a Cascade or a plastic cereal
container to make a trash can for the floor board of your car. I think I'm gonna use this up front on our next trip. Check it out here.
MORE Road Trip TIPS!!
- If you're going on a longer drive, be sure to make some stops for the little ones to stretch their legs. Plan ahead if possible and find a place with a playground or a place to run around. If your husband is like mine, he hates to stop and prefers our stops to be 30 mins or less!
Unless you come across a Nike outlet mall......it could be hours.

- Bring an extra set of clothes for each kiddo that is separate from their suitcase. Keep it handy in case your little one has a spill or an accident
Oh! That reminds me....
WHAT I WISH I HAD....
On a trip to New Orleans a couple years ago, my 2 year old daughter got car sick and vomited everywhere. She was in the back seat of my mom's Tahoe and I was in the middle seat directly in front of her. When I heard the gagging and turned around, luckily (well, kinda) I had my hoodie in my lap that I used to block most of the vomit. But her throwing up wasn't even the worst part...it was the aftermath of trying to get that smell out of the car!! AND, my sister and I were both pregnant with our sons at the time and suffering from morning (or all-day) sickness. It was awful.
Here is what I wish I had brought on that trip...
-Lysol Spray and FeBreeze spray
-an old towel or two
-paper towels
-barf bag (I actually had to use it on our next trip, and yes, with the same child, bless her heart)
-trash bags (to stash the dirty towels)
-extra car seat cover if you have one
 Here is my lovely puker on the way home from that trip with her new car seat cover we had to buy at Babies R Us along the way. It still smelled but wasn't as bad.
We now bring these things on every trip just in case!!
-Bring some flavored chapstick. Lips can get dry when traveling in the car with the A/C going so applying a little chapstick along the way may help.
-Remember to be patient. It's hard for kids to stay in one place when they are not strapped in so there may still be some meltdowns. But hopefully with your bag of tricks, they will be short-lived. Deep breaths are good. Not kidding, take
several and in front of your kids and have them join you! Modeling how to self soothe is beneficial! And, you have to admit...it really does make you feel better!
So, while it is true that road trips as you know it drastically change when traveling with kids, it can still be quite manageable and even FUN! Hope you find some things useful that you can take along with you on your next family adventure!
We leave for our journey to Colorado in two days so there may be a Part 2 to this post if we have anything else to share!
If you're new to the blog, be sure to follow me or leave some comments to let me know what you think! I would LOVE to hear some of your road trip tips as well!
HAPPY TRAILS!
Unless you come across a Nike outlet mall......it could be hours.


If you're new to the blog, be sure to follow me or leave some comments to let me know what you think! I would LOVE to hear some of your road trip tips as well!
No comments:
Post a Comment